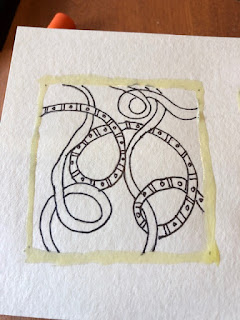
Welcome back to another fun-filled tutorial! I was introduced this fabulous technique by a classmate this month. She graciously said, "Please feel free to share with your students". So here are the steps to creating "Rainbow Laces". This tutorial will accompany the iMotion video posted below as well as in our Google Classroom. Have fun with the basics, then change it up and make it your own! Be sure to share photos in your Google classroom.
Materials:
paper (I used watercolor paper, but any type will work)
pencil
eraser
Black Sharpie (I used an ultrafine)
watercolor markers (Crayola or any generic brand will work)
water
paintbrush
optional: metallic gel pens
Step 1: Start with a clean sheet of paper. I was creating mini paintings in my Art journal (3"x3"), but you can take this much larger.
Step 2: Draw a squiggle somewhere on your paper. The squiggle MUST start on an edge and end on another edge. Any shape will do, BUT you will be creating a parallel squiggle so don't get too crazy!
Step 3: Create a second squiggle, then draw its parallel squiggle. It can be the same or completely different (as shown above).
Step 4: Create a third squiggle in a blank area of the paper and (you guessed it) create a parallel squiggle. You can continue this process multiple times depending upon the size of your paper and the size of your squiggles.
I think I need just one more. The corner looks a little bare. I think it is time to stop. Are you ready to bring out some detail??
Okay, think of over and under, over and under as you work to detail the laces. We will take it a step at a time. Don't jump ahead, don't move too fast, because THAT is when you will make a boo-boo. We will be setting the pencil aside and working with the Sharpie, so mistakes will be permanent!
Step 5: Choose one spot to start tracing over the lines. Remember the lines need to go over in one spot and under in the next. Look closely at the picture on the right. Do you see how some of the pencil lines are left untraced? This will be cleaned up later after the whole piece has been Sharpied.
Follow the whole length of one lace before moving on to a second lace (trust me, this is VERY important!). Can you see how the lace is moving in the picture above (over and under other laces)? Now it is time to move onto another lace.
Step 6: Choose a second lace to trace. Again think of the over and under pattern. Do not stress that the pencil marks are showing. You will NOT be tracing all of the lines as the process proceeds, so don't stress (I know my perfectionist students are freaking out a bit right now, but seriously...CHILL. It will work out!)
Continue tracing the individual laces until all have been touched in some way by the Sharpie. Take a look at the picture above. Do you see the untraced pencil marks? We are now going to perform MAGIC and make them disappear. Go get your eraser.....
Step 7: Erase over the whole picture, back and forth, until all of the pencil is gone. Isn't that better?! Can't you see the laces going up and down, in and out, over and under each other? Bet you thought we were done...NOPE. Now we will bring out the laces even more! We add PATTERNS ❤
Step 8: Choose one pattern from the list above or create your very own! Once again you are going to work on one lace at a time.
Using the Ultrafine Sharpie, draw a pattern the length of the lace. I chose straight lines for the first lace.
That pattern was a little too simple, so I added spots between the lines.
Zig-zags for the next lace. Be sure to choose something a bit different from the first so each lace will stand out (have its own personality).
Continue until all of the laces have a pattern.
Like it so far? Well, get ready for some color. For this lesson, I used watercolor markers in primary and secondary colors (red, orange, yellow, green, blue, purple). If you do not have watercolor markers, you can use actual watercolors and paint the background. OR you can use crayons, colored pencils...you choose. But I will say, using the watercolor markers is kind of magical. Watch and you will see what I mean.
Step 9: Begin by coloring one section at a time. Have the colors flow from section to section. Colors can be blended together for cool effects! Once every section has color applied it will be time to paint with water. (NOTE: If you use crayon or colored pencil, your piece will be complete when the coloring is finished).
Step 10: Paint each section carefully, keeping the water off the white laces. If you have used a light with a dark color to blend, begin painting from the light to the dark otherwise the light color may disappear as it is overwhelmed by the dark. Continue all the way around until all of the marker has been blended.
A paper towel can be used to blot away excess water during the process OR if color tries to run over the white laces.
For an optional touch, metallic gel pens can be used to highlight areas of the laces (as shown above). Don't give in to the pull of coloring everything with the metallic pens. For max impact, the laces should remain white.
I hope you have enjoyed this. I created an iMotion video of the process for a class that I am taking. Enjoy! If you have questions about the process do not hesitate to reach out either through email or in our Google Classroom.


No comments:
Post a Comment