Friday, July 23, 2021


Welcome to a New Year of Art fun!!  After a COVID year of teaching from a cart, I am SUPER excited to be returning to my classroom space!  Let me take you on a tour of my revamped and redecorated classroom.  
What room decoration and welcome would be complete without a welcoming entrance?  I think the kids will be excited to enter!  For those of you who are hanging-challenged with cinder block walls like mine, may I recommend the heavy-duty Command Strips.  I wiped down all the surfaces with Clorox wipes, dried them with paper towels, and then attached the Command Strips.  MAGIC!  So far only one picture has fallen, though these crosses may be tested as students rub along the walls (fingers crossed).


As you can see, inspiration abounds in this space.  I can honestly say that if there is an empty space, I have attached some kind of art to it.  I collect pieces to inspire my students from travels, thrift shops, local artists, former students, and eBay, as well as my own art.  In the front of my room, I showcase the Elements of Art.  


The Artist Oath and the A-R-T volume control posters are clearly visible over the whiteboard.  Teaching in a Catholic School we begin every class with a prayer (framed and hung above the whiteboard).  All 3 of these pieces are important for consistency throughout all of my classes (K-8th).  This year I will be adding PreK back into the mix, but I will be traveling across the campus to see them in their own space.  It won't be as overwhelming size-wise for them.  I look forward to them becoming Kindergarteners next year and coming into my space 💜


Continuing the tour around the room we pass by my desk (decorated of course).  The drying racks are ready for art projects to fill them.  Artwork (new and old pieces) line each divider between the windows (again, thank goodness for Command strips!).  I'm anxious to see how observant my students will be.  


This year we will have desks instead of tables, to accommodate distancing rules.  So far they are stacked in the center of the room but should be laid out soon.  Along this wall, you can see my new printmaking station, filled with brayers and awaiting the carving tools from my wishlist (more about that later).  The bunged-up green cabinets have been repainted to start the year fresh.


My brother's panoramic photo of bison in Yellowstone has moved from above the bulletin board paper rolls to above the door.  I think it is a much better fit!  The clock which disappeared last year is now safely back in place (it was a bit of a distraction last year).


New art has been hung over the bulletin board paper: a handmade and embossed triptych that I found at a thrift shop and will use as inspiration as we make our own handmade paper AND a painting done by a young Russian artist who is disabled (I bought this one specifically to show that anything is possible as long as you try).


That brings me back to my printing station and my wishlist.  I have created an Amazon wishlist in hopes that I can accumulate enough tools to teach my older students relief printing and how to create their own carved blocks.  The yellow bins will house the tools as they are accumulated.  If you would like to help stock my classroom, please follow the link below to my wishlist...and THANK YOU in advance 😁


I'm looking forward to a great 2021-22 school year!


Saturday, October 24, 2020

Whirled Peace


The buzz has started. All of the students are taking part in our very own version of Pinwheels for Peace. The International Day of Peace ("Peace Day") is observed around the world each year on 21 September. Established in 1981 by unanimous United Nations resolution, Peace Day provides a globally shared date for all humanity to commit to Peace above all differences and to contribute to building a Culture of Peace. We obviously are a little late but will honor the thought of World Peace with our very own Art installation.

"Whirled Peace" will be installed (weather permitting) after school on the grassy area in front of the school on November 2. I hope to leave the display intact for the week (again, weather permitting). Once taken down, all pinwheels marked with the student name and grade will be returned to the students. If you wish to join the installation, the image below should be printed on a sheet of cardstock and decorated before attaching to the eraser of a new pencil. I will have a collection box under the table at the front door. Message me with any questions 


Tuesday, May 19, 2020

Turtle time!

Welcome to another week of homeschooling, courtesy of the Coronavirus!  This week I will be sharing a project for my PreK students.  It combines their study of turtles with the recycling of magazines and junk mail that is flooding our homes.  Enjoy!


Materials:
1 paper plate
magazines, junk mail, newspaper
1 blank sheet of paper 
pencil
scissors
glue stick
crayons or markers

Step 1: Gather your materials.  I went through magazines and pulled out a variety of pages that had turtle colors appropriate for the shell.  Looking at the box turtle diagram above, you can see that turtles come in a variety of colors.  Your turtle can be realistic (that means it looks like the real thing) or it can be straight from your imagination (wouldn't a rainbow turtle shell be cool?!).  I decided to go for a turtle with a variety of greens, beiges, browns on its shell.  


Step 2: Begin cutting out shapes from the pages. You could make ovals like I did OR you could cut circles, triangles, squares.  It is totally up to you!  


NOTE: I cut my shapes out of the colored sections that went along with my turtle shell.  Remember to place the rest of the paper "trash" in your recycling bin.


Step 3: Beginning in the center of your plate, glue one shape down.  Then, start gluing piece around it in a circle pattern (see below).  I put the glue on the plate rather than putting the glue on the shape (I think it is easier to see where the pieces go).  That is a personal choice though.

Continue gluing shapes round and round until the plate is full.  While you are gluing your paper plate will flatten out.  DO NOT STRESS! Once all of the pieces are in place you can "POP" the turtle shell back into shape (see below).


Now it is time to create the rest of your turtle.

Step 4: On your blank sheet of paper, draw a head, tail, and 4 feet.  Do you see what shape the tail is??  RIGHT!  A triangle 😀  For your head, draw a circle and a neck (the neck looks like a rectangle).  Your feet can be any shape you wish.  I made mine round on one side and flat on the other, kind of like an oval with a flat side.


Step 5: Once your shapes are drawn, color them in.  I used green, but (again) use your imagination to color your turtle!  It could be green, brown, grey, black, OR a mixed up rainbow!  Be sure to draw a face on your turtle head.  I decided to give my turtle some toes 😉   Once you have finished coloring, cut out your pieces.


Step 6: Glue everything in place!  Turn the plate upsidedown (so you don't see the top of the shell).  I always start with the head followed by the tail.  Gluing these two pieces first will make it so much easier for placing the feet!


Now glue the feet in place.  

All done!!  Turn your turtle over and admire your beautiful creation ❤ 


I hope you have enjoyed creating your turtle.  If you are one of my students, please be sure to post a photo of your creation in the Google Classroom.  I can hardly wait to see!

And if you are a visitor to our blog, WELCOME!  Hope to see you again.


Tuesday, May 12, 2020

2020 Cardboard Challenge!

What can you make from cardboard?!  I am sure you are accumulating lots of boxes from cereal, crackers, Amazon shipments (haha).  Why not use that cardboard to CREATE a gorgeous sculpture?!

Follow the steps below and then post a photo in your Google Classroom!  ENJOY ❤


Tuesday, April 28, 2020

The Princess and the Pea crayon resist

Welcome to another Coronavirus stay-at-home project!  This project is for my 3rd graders, but any students Kindergarten and up can participate!  I love to combine reading/literature and Art.  I found a beautiful reading of Hans Christian Anderson's Fairy Tale "The Princess and the Pea" on YouTube: https://www.youtube.com/watch?v=waw0U9tKpW0

Students should watch the video before starting the project.  Then gather the materials and begin to create!

Materials:
paper (watercolor paper is best, but any available paper will work)
pencil
optional: Sharpie marker
crayons
watercolor (washable) markers and/or watercolors
paintbrush
water

Step 1:
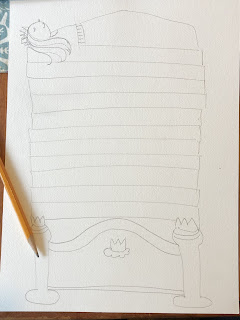
After listening to the story, use the pencil to sketch a headboard and then stack as many mattresses as possible on top!  In the story, the queen stacked how many on top of the pea??  That's right, 20! WOW!  Be sure to leave some room at the top to draw the princess on top of the mattresses.
Step 2: Once the sketch is complete, outline the pencil either with a Sharpie marker or crayon.  Do not use the washable markers for this step!  
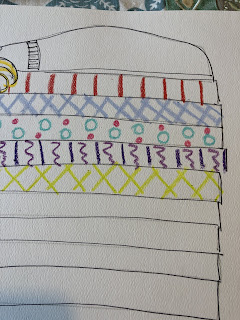
Step 3: Use crayons to add detail to each mattress, the headboard, and the princess.  No need to color in completely unless you are only working with crayons (I know some of you may not have watercolor markers or watercolors).

Step 4: Now we are going to perform some magic.  Did you know that watercolor/washable markers will bleed if you paint over them with water??  Basically, they become watercolor!  Isn't that cool?!  So if you do not have actual watercolors at home, you can try a new way to watercolor.  Start one section at a time.  Color in the area.  It doesn't have to be colored completely, because the water will help to fill the nooks and crannies!  Now as soon as you color one section "wash" over it with the paintbrush dipped into water.  Add more water as necessary.
You can see (above) I colored the center of the flowers only.  When I washed over the area with water, the color spread to fill in the area around the flowers, so the flowers are dark blue but the mattress is light blue (see below).  

Continue until all of the mattresses and the princess have been "painted". 
Step 5: If desired color the background.  What is happening around the princess on the bed?  Is there a carpet under the bed? Is there a picture on the wall?  Be as creative with the surroundings as you wish OR watch the video again for suggestions OR paint/color it plain like I did.

That's it!  You now have a beautiful Princess to hang on the refrigerator or front window for neighbors to see AND a story to tell! 
 For my students: Be sure to share a picture in the Google classroom.

Stay safe.  Hope we will see each other again soon ❤

Wednesday, April 8, 2020

Radial Symmetry Design: Part 2

Welcome back to my 4th grade Radial Symmetry design tutorial.  This week we will outline and color to our pencil design.  I know that a lot of your only have basic materials at home with you during this time of homeschooling. DO NOT STRESS!  You can use any or all of the following materials to give your art piece eye-catching details.  So take a deep breath and let's jump in.

Materials:
Crayons
Markers
Colored Pencils
Sharpies
Watercolors

Step 1: Outline
There are a few different ways that you can do the outline.  I chose to outline with a fine point Sharpie marker.  The Sharpie clearly defines the open areas where I will be adding color and pattern to make the design come to life.  

Another option would be to outline with a black crayon.  If you like doing Crayon Resist with watercolors, outlining with a black crayon would be a nice choice.  Be sure to use firm pressure while outlining.  This will apply enough wax from the crayon to resist the watercolors and keep areas separated.

Step 2: Step back from the basic design.  Are you happy with the look?  Does it look too simple?  What could be added?  As you are mulling these questions, I would suggest using a pencil to add any new touches, just in case they turn out to be something you would rather not keep in the design.
I think it may need a little more of...something
I think that is enough for now!  Time to finish the outlining.  
To complete the outlining, I used a little of this and little of that.  The curly bits needed the touch of an ultrafine Sharpie.  Using a thicker Sharpie or a crayon would destroy the delicate nature of the curls.  For the spots and butterfly-like lines, I used a black crayon (see close-up above).

Step 3: Color and pattern
The sky is the limit on this part.  Remember the radial symmetry.  If a color is applied in one part of the radius, then be sure to apply the color to the matching bits.  With the same thought in mind, if you apply a pattern to one area, be sure to match it in the others.
I started with crayon, coloring a section then stepping back to take a look.  The petals began as a curved Fuschia line in each section, then changed to the Fuschia outline with hot pink in the center.  Next dots,
then lines and a few solid areas, still using the crayons.
Another step back made me realize that it needed a little more balance between the center and the stripes on the outside, so I added the hot pink to the outside.  Now for some paint!
I used watercolors.  What I find fascinating about watercolors is how you can change the saturation of color by "repainting" using only water on the brush!  So cool.  It softens areas where the color was a little too dark and deepens color in other areas.
A touch of pinky-orange on top of the hot pink crayon filled in areas the crayon missed and softened the overall look of the petals.
Purple on top of purple crayon pretty much covered up the spots!  Easy peasy, lemon squeezy...paint over it with only water on the brush and then dab with a paper towel.  Viola!!  The spots pop out.  
Final touches, then paint the background and it is finished.  
I can hardly wait to see your finished Radial Designs!  I know they will all be stunning.  

NOTE for my 4th graders:  Don't forget to post your completed project to your Google Classroom assignment page for a grade!


Welcome to a New Year of Art fun!!  After a COVID year of teaching from a cart, I am SUPER excited to be returning to my classroom space!  L...