Tuesday, April 28, 2020

The Princess and the Pea crayon resist

Welcome to another Coronavirus stay-at-home project!  This project is for my 3rd graders, but any students Kindergarten and up can participate!  I love to combine reading/literature and Art.  I found a beautiful reading of Hans Christian Anderson's Fairy Tale "The Princess and the Pea" on YouTube: https://www.youtube.com/watch?v=waw0U9tKpW0

Students should watch the video before starting the project.  Then gather the materials and begin to create!

Materials:
paper (watercolor paper is best, but any available paper will work)
pencil
optional: Sharpie marker
crayons
watercolor (washable) markers and/or watercolors
paintbrush
water

Step 1:
After listening to the story, use the pencil to sketch a headboard and then stack as many mattresses as possible on top!  In the story, the queen stacked how many on top of the pea??  That's right, 20! WOW!  Be sure to leave some room at the top to draw the princess on top of the mattresses.
Step 2: Once the sketch is complete, outline the pencil either with a Sharpie marker or crayon.  Do not use the washable markers for this step!  
Step 3: Use crayons to add detail to each mattress, the headboard, and the princess.  No need to color in completely unless you are only working with crayons (I know some of you may not have watercolor markers or watercolors).

Step 4: Now we are going to perform some magic.  Did you know that watercolor/washable markers will bleed if you paint over them with water??  Basically, they become watercolor!  Isn't that cool?!  So if you do not have actual watercolors at home, you can try a new way to watercolor.  Start one section at a time.  Color in the area.  It doesn't have to be colored completely, because the water will help to fill the nooks and crannies!  Now as soon as you color one section "wash" over it with the paintbrush dipped into water.  Add more water as necessary.
You can see (above) I colored the center of the flowers only.  When I washed over the area with water, the color spread to fill in the area around the flowers, so the flowers are dark blue but the mattress is light blue (see below).  

Continue until all of the mattresses and the princess have been "painted". 
Step 5: If desired color the background.  What is happening around the princess on the bed?  Is there a carpet under the bed? Is there a picture on the wall?  Be as creative with the surroundings as you wish OR watch the video again for suggestions OR paint/color it plain like I did.

That's it!  You now have a beautiful Princess to hang on the refrigerator or front window for neighbors to see AND a story to tell! 
 For my students: Be sure to share a picture in the Google classroom.

Stay safe.  Hope we will see each other again soon ❤

Wednesday, April 8, 2020

Radial Symmetry Design: Part 2

Welcome back to my 4th grade Radial Symmetry design tutorial.  This week we will outline and color to our pencil design.  I know that a lot of your only have basic materials at home with you during this time of homeschooling. DO NOT STRESS!  You can use any or all of the following materials to give your art piece eye-catching details.  So take a deep breath and let's jump in.

Materials:
Crayons
Markers
Colored Pencils
Sharpies
Watercolors

Step 1: Outline
There are a few different ways that you can do the outline.  I chose to outline with a fine point Sharpie marker.  The Sharpie clearly defines the open areas where I will be adding color and pattern to make the design come to life.  

Another option would be to outline with a black crayon.  If you like doing Crayon Resist with watercolors, outlining with a black crayon would be a nice choice.  Be sure to use firm pressure while outlining.  This will apply enough wax from the crayon to resist the watercolors and keep areas separated.

Step 2: Step back from the basic design.  Are you happy with the look?  Does it look too simple?  What could be added?  As you are mulling these questions, I would suggest using a pencil to add any new touches, just in case they turn out to be something you would rather not keep in the design.
I think it may need a little more of...something
I think that is enough for now!  Time to finish the outlining.  
To complete the outlining, I used a little of this and little of that.  The curly bits needed the touch of an ultrafine Sharpie.  Using a thicker Sharpie or a crayon would destroy the delicate nature of the curls.  For the spots and butterfly-like lines, I used a black crayon (see close-up above).

Step 3: Color and pattern
The sky is the limit on this part.  Remember the radial symmetry.  If a color is applied in one part of the radius, then be sure to apply the color to the matching bits.  With the same thought in mind, if you apply a pattern to one area, be sure to match it in the others.
I started with crayon, coloring a section then stepping back to take a look.  The petals began as a curved Fuschia line in each section, then changed to the Fuschia outline with hot pink in the center.  Next dots,
then lines and a few solid areas, still using the crayons.
Another step back made me realize that it needed a little more balance between the center and the stripes on the outside, so I added the hot pink to the outside.  Now for some paint!
I used watercolors.  What I find fascinating about watercolors is how you can change the saturation of color by "repainting" using only water on the brush!  So cool.  It softens areas where the color was a little too dark and deepens color in other areas.
A touch of pinky-orange on top of the hot pink crayon filled in areas the crayon missed and softened the overall look of the petals.
Purple on top of purple crayon pretty much covered up the spots!  Easy peasy, lemon squeezy...paint over it with only water on the brush and then dab with a paper towel.  Viola!!  The spots pop out.  
Final touches, then paint the background and it is finished.  
I can hardly wait to see your finished Radial Designs!  I know they will all be stunning.  

NOTE for my 4th graders:  Don't forget to post your completed project to your Google Classroom assignment page for a grade!


Wednesday, April 1, 2020

4th grade Radial Symmetry Art lesson

      With the Coronavirus in full swing here in the United States, schools have been let out for the remainder of the school year and the teachers have been sent home to teach online.  I must admit that when this unusual journey began I thought "How on Earth am I going to teach art online and actually get the kids to participate?"  Now going into my 3rd week of teaching online I feel like I am getting into a groove.

Normally at this time of the year, my 4th grade creates amazing dimensional Radial Symmetry designs using origami folds, bright colored construction paper, and glue. 
      

With the bulk of my students having only basic art materials at home, I knew that even attempting the project would be a meltdown in the making for all of us!  So I redesigned the lesson to use basic materials: paper, pencil, scissors, and color.  Here is my step-by-step lesson for Radial Symmetry.

NOTE TO MY STUDENTS:  Have fun with this project.  Once you are finished, please post your completed design to the Google Classroom assignment post.  Have fun!  I can hardly wait to see what you come up with (((HUGS)))

Radial Symmetry

Materials: 
Paper (whatever paper you have on hand will work fine.  I used paper from my art journal)
Pencil 
Eraser (just in case you make a boo-boo or want to change an area)
Scissors
Color (crayons, colored pencils, markers, watercolors...whatever you have on hand at home)
something round to trace (bowl, plate, lids, etc.)


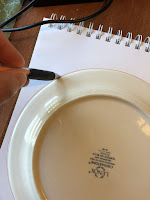
Place your bowl, plate, round object onto your paper and trace all the way around.  Once you have completed the circle, remove the plate, bowl, etc., then trace it one more time on a second sheet of paper. (NOTE: Be sure to help mom out and put it away when you are done!)
Cut out one of the circles.  Cut carefully on the line!  Throw away any trash (please).
Now we are going to do some folds.  Take your time, matching up edges as you go.

First, fold your circle in half. Match up the edges (as shown), then press along the fold to create a crisp, clean edge (sorry, that sounds rather redundant, but I think you know what I mean) 
Next, fold in half again.  Press along the folds to create crisp, clean edges. 
Finally, fold it one more time in half.  If you have followed the directions, your circle will be divided into 1/8ths when you open it up!   
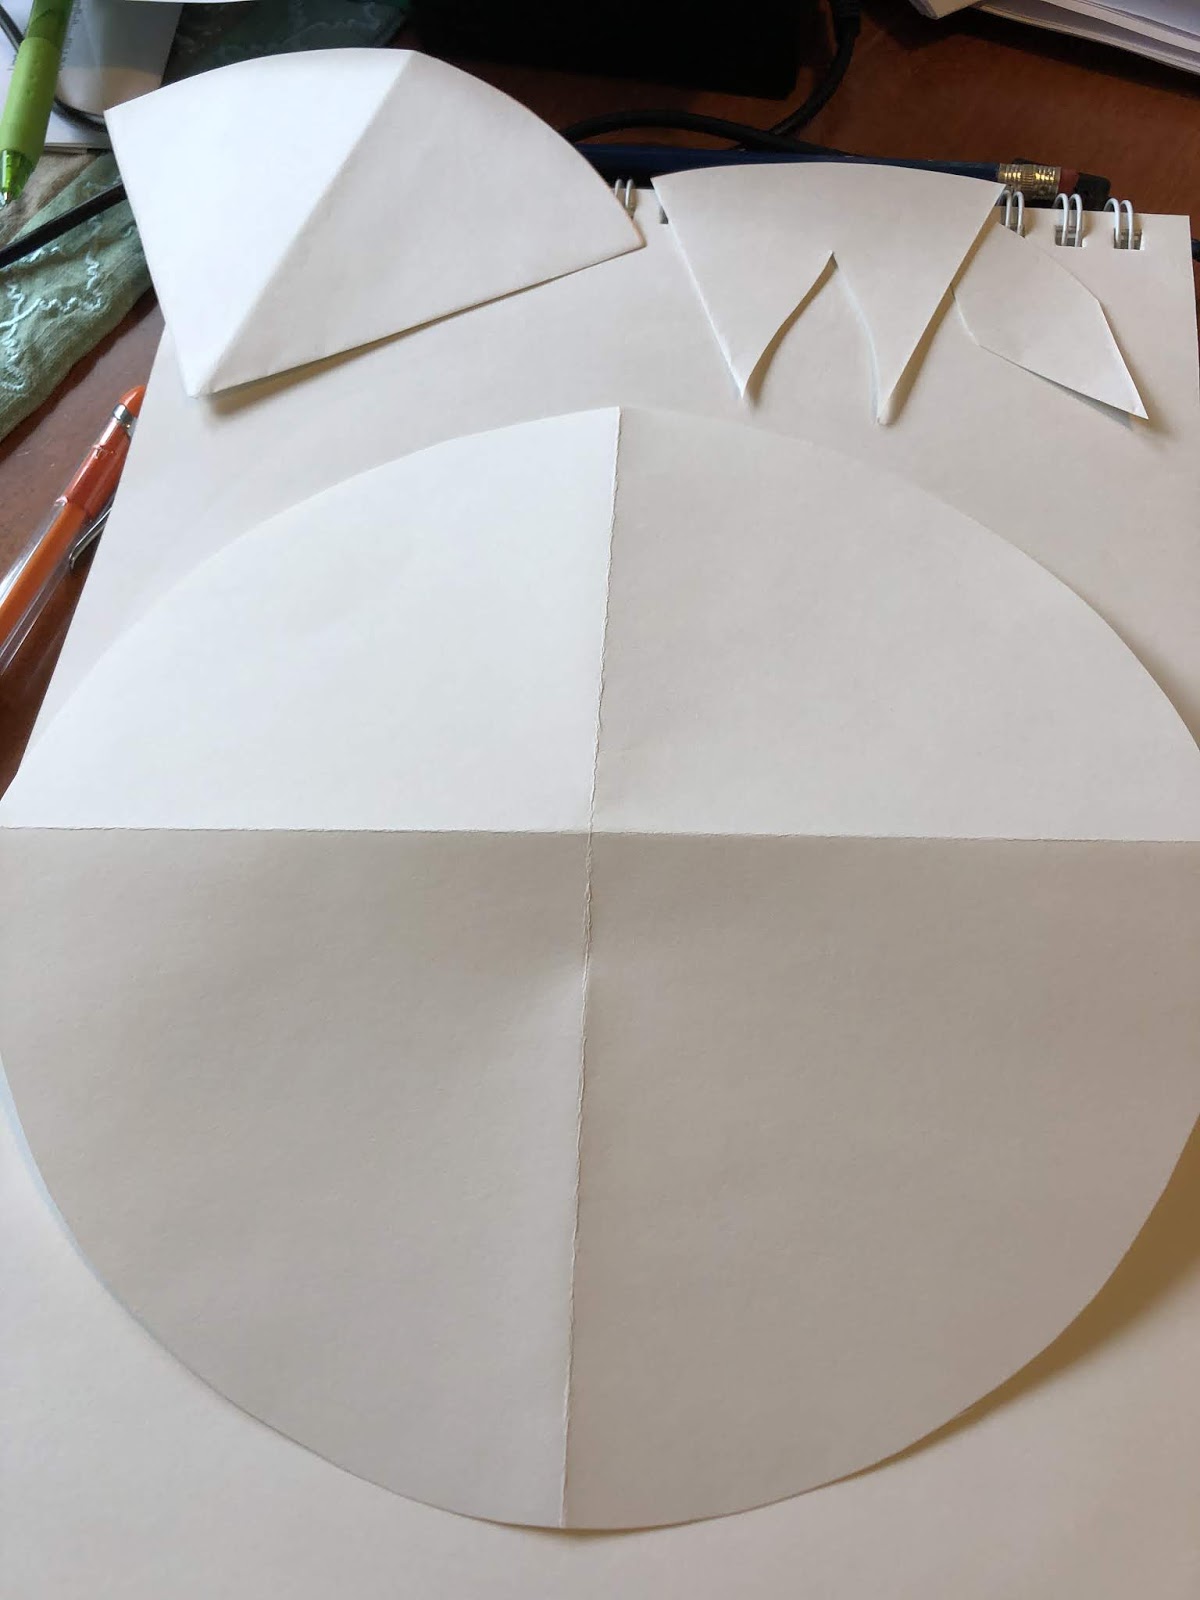
Open the circle up, then get your scissors.  We are going to cut 2 wedges out of the circle (NOTE:  Only cut wedges out of ONE of the circles.  Set the other circle aside).  The first wedge should be a 1/8th wedge.  The second should be a 1/4 wedge.  Set the rest of your divided circle aside.  It will give you extra pieces in case you change your mind about a shape you create or you just want additional details.
Now we are ready for some design fun!  Let's start with the 1/8th wedge.  Draw a random shape on the wedge.  Be sure to incorporate the point (center of the circle) into your shape.
Cut out your shape carefully. Now you have 2 possible templates to use for the radial design!
Grab the circle you set aside.  Fold it in half and then in half again, before opening it.  Your circle should be divided into 1/4's.
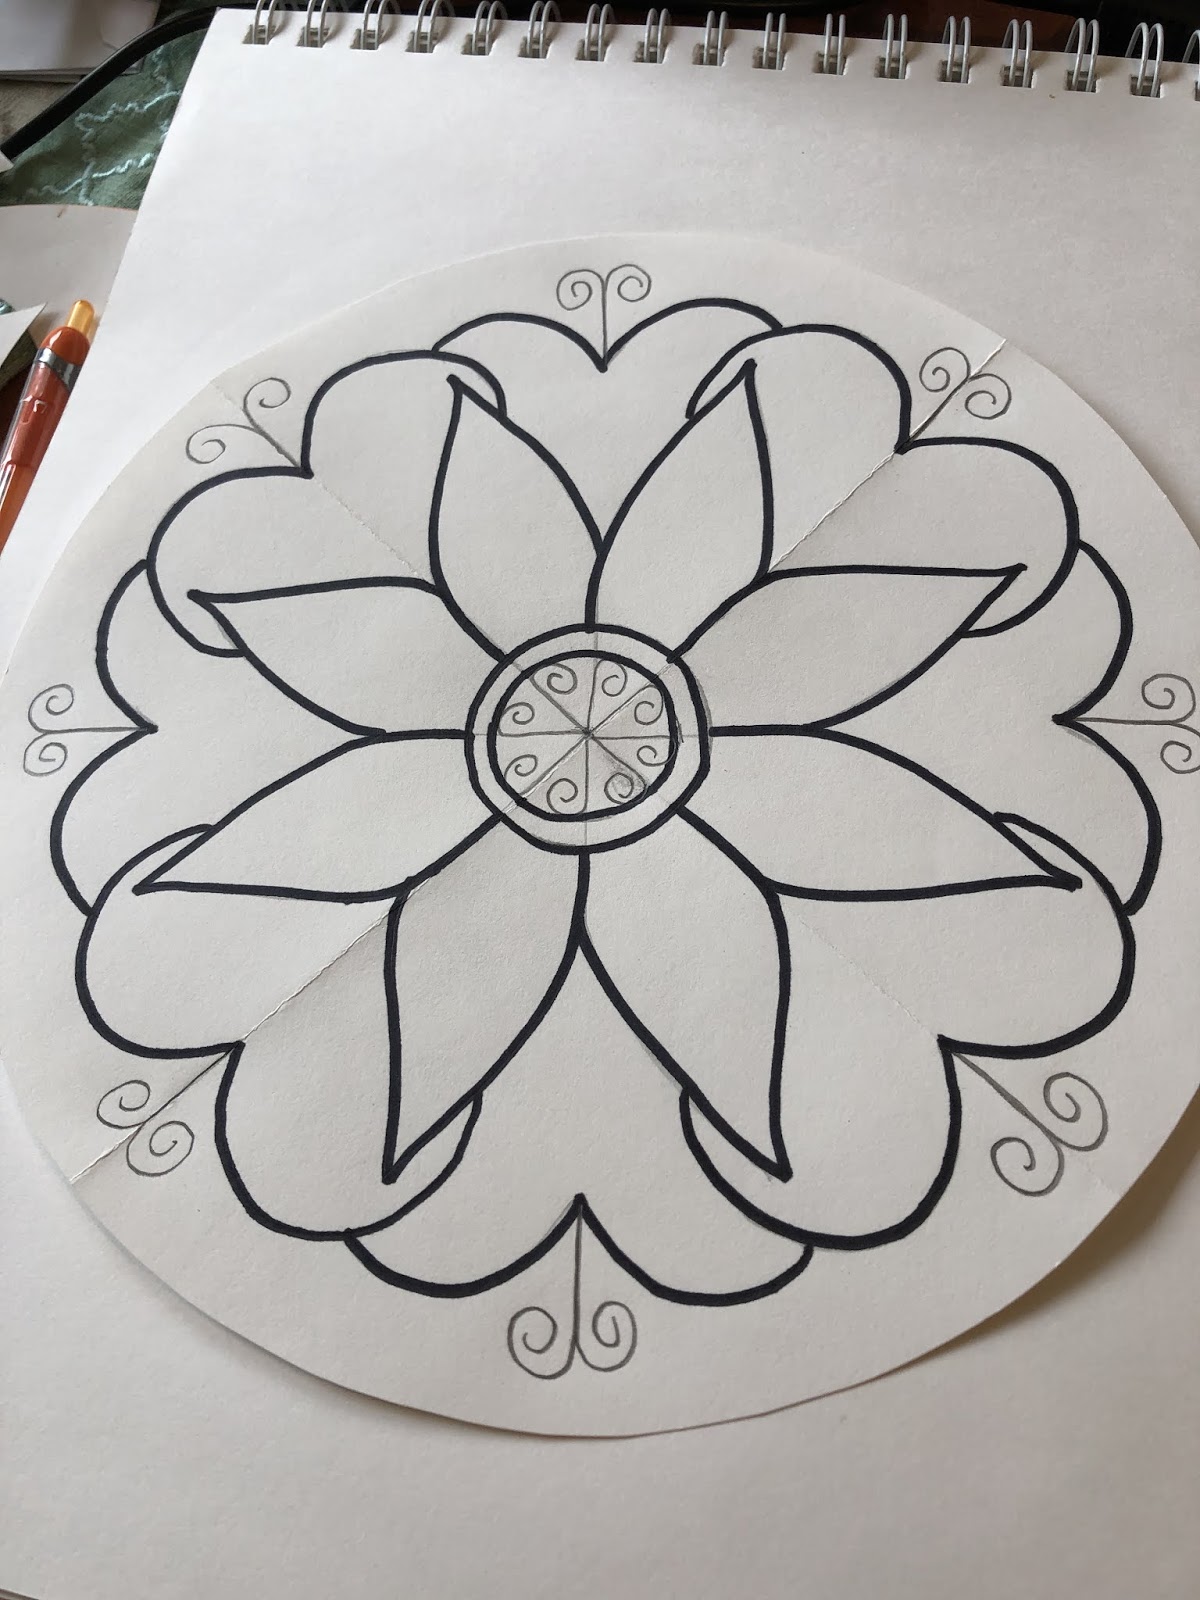
Choose one of the templates to work with.  I decided to use my petal shape and start the design.  Place the point of your shape in the center of the circle as shown.
Make sure the point touches the center and the edge (as shown).  Trace along the edges, all the way down to the center of the circle.  Flip the template, line up with the next edge and trace again.  (NOTE: You will need to flip the shape [think mirror image] for your design to work out.  BUT if you forget or this step confuses you, I am sure it will work out fine.  Don't stress!! 😱)
Continue around the circle until you have completed your first design element.


Now to work with the 1/4 wedge, but for this one I want you to fold the wedge in half first.  Draw your shape on the folded edge.  Any shape will work, but be sure the point is a part of the shape.  You can see I drew a teardrop on my fold and that formed a heart once it was cut out.

This time I want you to use the template that has a curved edge.  Position your template as shown, lining up the edges of the template with the folded lines of your circle and the curved edge with the curved edge of the circle.
Use the pencil to trace the shape inside the template.  Once you have traced it once, move the template to the next 1/4 space and trace it a second time.  Repeat until you have traced the shape 4 times.
Are you getting excited??  We are almost done!  Now I want you to trace your template 4 more times.  Can you guess where??  That is right!  In the empty space.  When you have that completed, your design should look something like this:
Now, of course, your shapes may be different than the ones I chose to use, so your design will not be identical to mine.  But that is the way it should be...you guys know that "cookie-cutter Art" makes my skin crawl!  
It is time to add your own extra details to the piece.  I decided to trace a couple of bottle caps in the center.  Maybe you decide to add a few more details around the edges.  Just remember to keep whatever you do symmetrical!


Alrighty, I am going to stop the lesson now.  Get your design completed to this point and then put it in a safe place (DON"T lose it!!).   

For my 4th graders: post a photo of your progress to our Google Classroom assignment page. Next week we will work on color and texture and POP for our radial design.
Until then, I miss all of you terribly!  I can hardly wait for us to be together again (((HUGS)))


How Can It Almost Be Thanksgiving?!

Oh my goodness, it has been a busy year!  I blinked and it is almost Thanksgiving.  Of course, that will be followed by a flurry of Christmas projects in the Art Room ❤  Let me show you a bit of what has been going on since the last post.

PreK entered my world this year and I have to say they are the most wonderful of additions!  We have been working on scissor skills, color mixing, and shapes among other things.
A couple of self-portraits, colored with bleeding tissue paper and water

My Middle School students created amazing pieces for the Fall Art Project.  This year the themes were Wearable Art, Shoe Art, or Canvas Art.  They didn't disappoint! 
The trunks of these trees were textured with hot glue "bark".  What a wonderful touch!

Lina (grade 7) designed this canvas and went into detail about how it was created when presenting to her classmates.

Dominic (grade 8) was inspired by a project we created while he was in 4th grade.  He made this amped-up version of the original.  Each of the tubes is created from a 1"x2" piece of paper, rolled into a tube and glued after it had been decorated.

Vianka created this fabulous shirt using acrylic paints and fabric medium, plus fabric flower details.

Welcome to a New Year of Art fun!!  After a COVID year of teaching from a cart, I am SUPER excited to be returning to my classroom space!  L...